Creating Web Applications with paramate
Creating a web application using paramate should be a step further from the configurator tutorial. In this section, we will introduce how to create a basic web application that interacts with a paramate configurator using the paramate JavaScript libraries.
How it works
A web application consists of a web page that interacts with the paramate system through the paramate JavaScript API. The web page is used to build the user interface of the application. It contains Controls, to change any of the available parameters, and a Viewport, that renders the generated geometry. This is how users will input data and see the resulting output. The web page can be built using the usual web technologies: HTML, CSS and JavaScript.
Setting up the web app in your computer
Now, create the following folders and files somewhere in your computer:
|---- webapp/
|     └---- index.html
The webapp folder will contain all the files for the web page. The index.html file should be empty now, but we will soon add some content to them!
Open the index.html file in a text editor. Now go back to the Configurator Details page (that you have created in the configurator tutorial) and copy the sample HTML page provided by the Info popup and paste it inside the index.html file and save it. By checking it out, you can see that it already imports all the necessary files from the paramate JavaScript API and set up a configurator object with the API Key and Configurator ID from your Configurator. If you want to learn more about how to set up and initialize a web page with the paramate JavaScript API, check out the Launching a Configurator documentation.
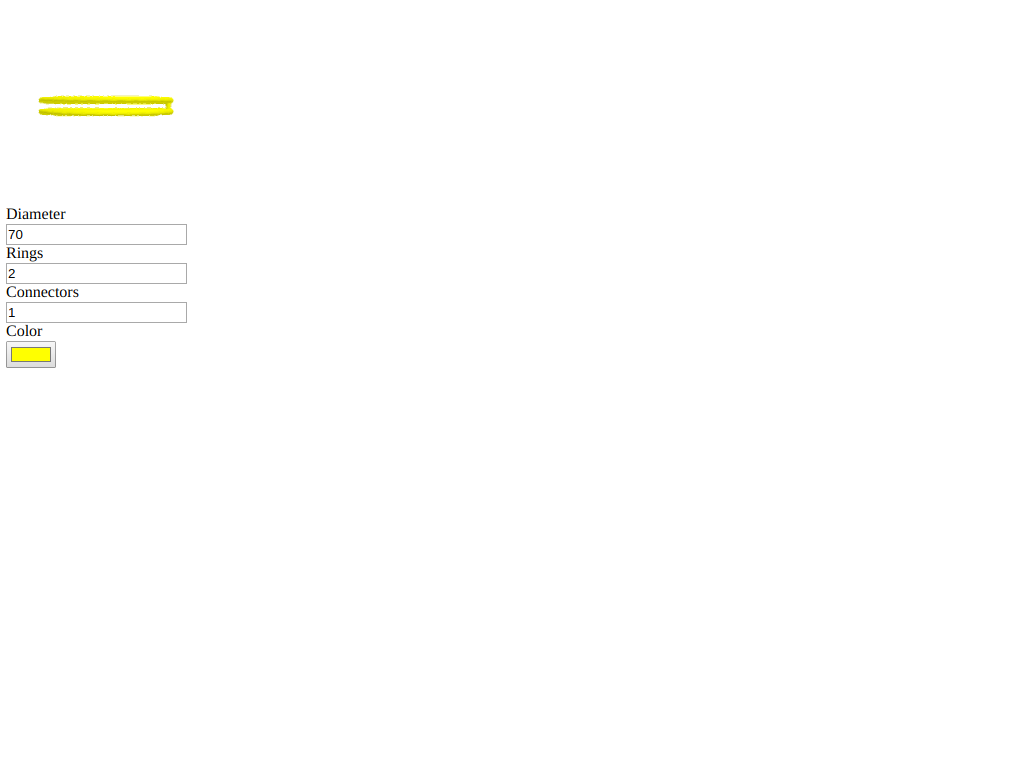
Nice! Now that everything is set up, you can open the index.html that you have created in your computer in your browser. You should see something like the following image:
What's up next?
From here, you could work on improving your interface. You can learn more about the Controls. In this example, the Auto-Generated Controls are used. They are HTML elements automatically generated by the paramate JavaScript library. Since they are already created with some specific classes, you can use use those classes to add some CSS stylings to your controls. You can see an example of an Auto-Generated Control next:
<div class="paramateParamContainer">
  <div class="paramateParamAttr" data-paramate-paramname="main:innerDiam" data-paramate-paramattr="name">Diameter</div>
  <input type="number" step="any" value="70" class="paramateParam" data-paramate-paramname="main:innerDiam">
</div>
The paramateParamContainer class can be used to change the element wrapping each control; the paramateParamAttr class affects the HTML element that contains the name of the parameter; finally, the paramateParam class affects the HTML input element that holds the parameter value. All these classes can be used to manipulate the visuals of your Controls.
A bit more advanced kind of Controls are the Manually Generated Controls. Those give you more flexibility on how the interface is created to interact with your Configurator. They require a different setup than the one used for the Auto-Controls, though. Just check out the documentation to learn how to do it.
The paramate JavaScript API documentation covers everything that can be done with the API. Just go through it to learn more and discover all the possibilities. Also, remember to check the paramate System Documentation to learn more about trCAD and Rhino / Grasshopper integrations and more.